Case-insensitive node name search with XPath

To do a case-insensitive search for node names with XPath, use something like this:

"//form[translate(., 'ABCDEFGHIJKLMNOPQRSTUVWXYZ', 'abcdefghijklmnopqrstuvwxyz')]"

This example searches for FORM tags inside an XML document. The dot ‚.‘ here means that it applies to the tag name.

Therefore the above would match e.g. „form“, „FORM“, „Form“ or „fOrm“.

The Microsoft Knowledge Base article „INFO: Use XPath to Perform a Case-Insensitive Search with MSXML“ helped me to find out.

Kostenlose Alternative zu Red Gate SQL Compare und SQL Data Compare

Vorhin über eine Frage auf Stack Overflow gestolpert, wurde ich auf

xSQL Schema Compare und xSQL Data Compare Lite

aufmerksam. Diese Tools sind ähnlich wie die „großen“ Tools von Red Gate, nämlich SQL Compare und SQL Data Compare.

Damit könnt Ihr Datenbank-Schemas abgleichen und auch Datenbank-Tabellen-Inhalte zwischen zwei Datenbanken synchronisieren.

Sehr hilfreich!

Die Limitationen der Lite-Version sind:

  • up to 25 tables
  • up to 40 views
  • up to 40 stored procedures
  • up to 40 functions

Sobald eine dieser Werte überschritten wird, läuft die Lite-Version nicht.

Eine Ausnahme ist die Verwendung von SQL Server Express. Auf dieser Version läuft die Lite-Version immer, egal, wie viele Objekte enthalten sind.

Von Windows 7 aus via ODBC auf eine benannte SQL-Server-2000-Instanz zugreifen

Heute ist Legacy-Tag!

Issue

Für ein Projekt müssen wir von Microsoft Office Access 2010 auf einen SQL Server 2000 via ODBC zugreifen.

Die Herausforderung ist, dass der SQL Server 2000 als benannte Instanz („Named instance“) auf dem Server installiert ist (Windows 2008 R2). Also so was wie „MEINSERVER\SQL2000“, anstatt nur „MEINSERVER“.

Lokal auf dem Server kann ich wunderbar auf den SQL Server 2000 zugreifen, alleine via Netzwerk von einem PC mit Windows 7 ging es nicht. Es kam immer wieder die Meldung, dass keine Verbindung hergestellt werden konnte.

Lösung

Die Lösung war dann im Microsoft-Knowledge-Base-Artikel „How to connect to SQL Server by using an earlier version of SQL Server“ zu finden:

Vom Prinzip via cliconfg.exe-Programm auf dem Client einen Alias zu IP-Adresse und Port des SQL Server 2000 machen und dann über den Alias zugreifen.

Zitate aus der Lösung:

Server:

Determine the TCP/IP port number of the instance of SQL Server. To do this, use one of the following methods, depending on which version of SQL Server that you are running.

  1. On the server that is running SQL Server 2000, start the Server Network Utility. To do this, click Start, click All Programs, click Microsoft SQL Server, and then click Server Network Utility.
  2. Click the General tab, and then select the instance that you want from the Instances list.
  3. Click TCP/IP, and then click Properties. The TCP/IP port number for this instance is shown. Note this number so that you can use it later.

Client:

Configure the server alias on the client computer. To do this, use one of the following methods, depending on your version of SQL Server.

  1. Start the Client Network Utility. To do this, click Start, click Run, type cliconfg.exe, and then press Enter.
  2. On the General tab, verify that TCP/IP appears in the list under Enabled protocols by order.
  3. Click the Alias tab, and then click Add.
  4. Under Network libraries, select TCP/IP.
  5. In the Server name text box, type the IP address of the server that is running SQL Server 2000.
    Note The IP address that you type here is the one that is configured to use the TCP/IP port number.
  6. Click to clear the Dynamically determine port check box, and then type the port number of the instance of SQL Server 2000 in the Port number text box.
  7. Type a name in the Server alias text box, and then click OK.

Dann ging die ODBC-Verbindung („Verbindungstest“ war erfolgreich).

Alle Sichten in einer Microsoft-SQL-Server-Datenbank aktualisieren

Um alle Views in einem Rutsch zu aktualisieren, hilft folgender Code:

DECLARE @view AS VARCHAR(255);

DECLARE views_cursor CURSOR FOR 
    SELECT TABLE_SCHEMA + '.' +TABLE_NAME FROM INFORMATION_SCHEMA.TABLES 
    WHERE TABLE_TYPE = 'VIEW' 
    AND OBJECTPROPERTY(OBJECT_ID(TABLE_NAME), 'IsMsShipped') = 0 
    ORDER BY TABLE_SCHEMA,TABLE_NAME 

OPEN views_cursor 

FETCH NEXT FROM views_cursor 
INTO @view 

WHILE (@@FETCH_STATUS <> -1) 
BEGIN
    BEGIN TRY
        EXEC sp_refreshview @view;
        PRINT @view;
    END TRY
    BEGIN CATCH
        PRINT 'Error during refreshing view "' + @view + '".';
    END CATCH;

    FETCH NEXT FROM views_cursor 
    INTO @view 
END 

CLOSE views_cursor; 
DEALLOCATE views_cursor;

Funktioniert wunderbar.

In der Praxis z. B. hilfreich, wenn in den zugrunde liegenden Tabellen Spalten hinzugekommen sind oder entfernt wurden.

CryptographicException bei Verwendung von Oracle.ManagedDataAccess lösen

Gestern hatte ein Kollege beim Aufsetzen einer Website ASP.NET MVC 4 auf einem IIS unter Windows Server 2008 R2 eine Fehlermeldung:

[CryptographicException: Unbekannter Fehler -1073741766.]
   System.Security.Cryptography.ProtectedData.Protect(Byte[] userData, Byte[] optionalEntropy, DataProtectionScope scope) +504
   Oracle.ManagedDataAccess.Client.ConnectionString.Secure() +493
   OracleInternal.ConnectionPool.PoolManager`3.Initialize(ConnectionString cs) +1760
   OracleInternal.ConnectionPool.OraclePoolManager.Initialize(ConnectionString cs) +21
   OracleInternal.ConnectionPool.OracleConnectionDispenser`3.GetPM(ConnectionString cs, PM conPM, ConnectionString pmCS, Byte[] securedPassword, Byte[] securedProxyPassword, Boolean& bAuthenticated, Boolean& newPM) +296
   OracleInternal.ConnectionPool.OracleConnectionDispenser`3.Get(ConnectionString cs, PM conPM, ConnectionString pmCS, Byte[] securedPassword, Byte[] securedProxyPassword) +1576
   Oracle.ManagedDataAccess.Client.OracleConnection.Open() +3756
   OracleInternal.EntityFramework.EFOracleProviderServices.GetDbProviderManifestToken(DbConnection connection) +274
   System.Data.Common.DbProviderServices.GetProviderManifestToken(DbConnection connection) +91

[ProviderIncompatibleException: Der Anbieter hat keine ProviderManifestToken-Zeichenfolge zurückgegeben.]
   System.Data.Common.DbProviderServices.GetProviderManifestToken(DbConnection connection) +10947809
   System.Data.Entity.ModelConfiguration.Utilities.DbProviderServicesExtensions.GetProviderManifestTokenChecked(DbProviderServices providerServices, DbConnection connection) +48

[ProviderIncompatibleException: An error occurred while getting provider information from the database. This can be caused by Entity Framework using an incorrect connection string. Check the inner exceptions for details and ensure that the connection string is correct.]
   System.Data.Entity.ModelConfiguration.Utilities.DbProviderServicesExtensions.GetProviderManifestTokenChecked(DbProviderServices providerServices, DbConnection connection) +242
   System.Data.Entity.DbModelBuilder.Build(DbConnection providerConnection) +82
   System.Data.Entity.Internal.LazyInternalContext.CreateModel(LazyInternalContext internalContext) +88
   System.Data.Entity.Internal.RetryLazy`2.GetValue(TInput input) +248
   System.Data.Entity.Internal.LazyInternalContext.InitializeContext() +524
   System.Data.Entity.Internal.InternalContext.GetEntitySetAndBaseTypeForType(Type entityType) +26
   System.Data.Entity.Internal.Linq.InternalSet`1.Initialize() +71
   System.Data.Entity.Internal.Linq.InternalSet`1.GetEnumerator() +21
   System.Collections.Generic.List`1..ctor(IEnumerable`1 collection) +446
   System.Linq.Enumerable.ToList(IEnumerable`1 source) +80

Zunächst war es eine Herausforderung, statt den „normalen“ Oracle.DataAccess-Klassen die Oracle.ManagedDataAccess-Klassen zum Laufen zu bringen. Hier haben uns zwei Artikel geholfen:

Wir haben dann zum Lösen des eigentlichen Fehlers lange rumgesucht, viel ausprobiert und schließlich beim Weblog-Artikel „SOLVED: Windows Identity Foundation – “The system cannot find the file specified”“ fündig geworden.

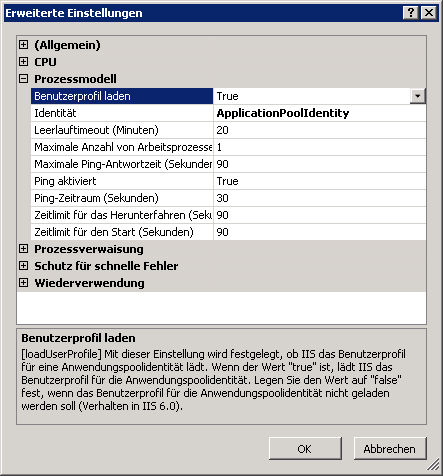
Die Lösung bestand dann schlicht darin, im Anwendungspool (App Pool) für die Anwendung die Option „Benutzerprofil laden“ auf „True“ zu stellen:

IIS App Pool - Benutzerprofil laden

Danach lief alles wie gewünscht.

„RIGHT“-Funktion in Oracle

Um die letzten n Zeichen einer Zeichenfolge zu ermitteln gibt es in Basic z.B. die Right-Funktion.

Große Dateien sendenHomepage erstellenSharepoint StuttgartTest Management Software

In Oracle gibt es dazu SUBSTR-Funktion. Wird diese mit einer negativen Zahl aufgerufen, so wird vom Ende der Zeichenfolge gezählt, was einer Right-Funktion entspricht.

Beispiele:

substr(‚This is a test‘, 6, 2)Liefert ‚is‘ als Ergebnis
substr(‚This is a test‘, 6)Liefert ‚is a test‘ als Ergebnis
substr(‚TechOnTheNet‘, 1, 4)Liefert ‚Tech‘ als Ergebnis
substr(‚TechOnTheNet‘, -3, 3)Liefert ‚Net‘ als Ergebnis
substr(‚TechOnTheNet‘, -3)Liefert ebenfalls ‚Net‘ als Ergebnis
substr(‚TechOnTheNet‘, -6, 3)Liefert ‚The‘ als Ergebnis
substr(‚TechOnTheNet‘, -8, 2)Liefert ‚On‘ als Ergebnis

(Via Tech on the Net)

Creating an XtraReports report that works both with Microsoft SQL Server and VistaDB

Currently I am extending and enhancing the reporting system for our test management tool Zeta Test.

In this article I will describe the issues I discovered (and solved) when trying to design one single report that works with both Microsoft SQL Server and VistaDB.

Creating a report

I decided to go with XtraReports from DevExpress as the reporting system.

The basic design steps creating and deploying a report with XtraReports is similar to methods when working with e.g. Microsoft SQL Server Reporting Services:

  1. Create a new report in the designer of XtraReports.
  2. Specify connection string/settings (using the SqlClient namespace classes).
  3. Specify tables/SQL queries to use as the data source for the report.
  4. Design your report graphically.
  5. Save the report to a .REPX file.
  6. Pack the .REPX file into the deployment setup.
  7. Ship the setup to the customers.

Displaying a report

In Zeta Test I had to perform the following steps when displaying a report:

  1. Load the report.
  2. Replace the design-time connection string by the connection string to the currently used database of the currently loaded project in Zeta Test.
  3. Display the report in a print-preview form.

Two databases

Since a project in Zeta Test can either use Microsoft SQL Server or VistaDB as the back-end database, I wanted to design a single report so that it can be used with both back-end databases.

Inially I planned to simply design the reports with an OleDB connection to the SQL Server database and then later when displaying the report for a VistaDB database, simply switch the connection string to the VistaDB database.

Unfortunately there is no OleDB provider for VistaDB. Therefore this solution did not work. Another idea was to simply leave the SqlClient classes that were used when designing the report as they are, only changing the connection string. This did not work, either.

So I did come up with another solution that works quite well as of writing this article:

Rewriting the .REPX report

A .REPX report file is a C# source code file that gets compiled when loading the report with the XtraReport.LoadLayout method.

I decided to give the following „algorithm“ a try:

  1. Load a .REPX file that was designed with the SqlClient classes as a string into memory.
  2. Do some string replacements to replace all SqlClient classes by their VistaDB counterparts.
  3. Call XtraReport.LoadLayout on the replaced string.
  4. Display the report in a print-preview form.

Luckily, after some try and error I actually was able to get this working!

In the following chapter I outline some of the methods I created in order to hopefully give other developers some ideas to use in their own applications:

Code to rewrite a .REPX report

The following method is the main method that is being called in order to load and display a report. It is a member of the print-preview form:

public void Initialize(
    FileInfo reportFilePath,
    Pair<string, string>[] parameters)
{
    var report = new XtraReport();

    if (Host.Current.CurrentProject.Settings.IsVistaDBDatabase)
    {
        var rawContent = UnicodeString.ReadTextFile(reportFilePath);

        var replacedContent = replaceSqlClientForVistaDB(rawContent);

        using (var ms = new MemoryStream(
            Encoding.Default.GetBytes(replacedContent)))
        {
            report.LoadLayout(ms);
        }
    }
    else
    {
        // Assumes that the report was designed with SQL Server.
        // If not, one would have to replace the other way, i.e.
        // from VistaDB to SQL Server.
        // I am leaving this out until really needed.
        report.LoadLayout(reportFilePath.FullName);
    }

    // --
    // Change connection string.

    var da = report.DataAdapter as DbDataAdapter;

    if (da != null)
    {
        adjustConnectionString(da.SelectCommand);
        adjustConnectionString(da.InsertCommand);
        adjustConnectionString(da.DeleteCommand);
        adjustConnectionString(da.UpdateCommand);
    }

    // --
    // Adjust parameters.

    if (parameters != null && parameters.Length > 0)
    {
        foreach (var parameter in parameters)
        {
            if (containsParameter(report.Parameters, parameter.First))
            {
                report.Parameters[parameter.First].Value = parameter.Second;
            }
        }
    }

    // --
    // Bind the report's printing system to the print control.

    printControl.PrintingSystem = report.PrintingSystem;

    // Generate the report's print document.
    report.CreateDocument();
}

The actual method to replace the string is the following:

private static string replaceSqlClientForVistaDB(string content)
{
    if (string.IsNullOrEmpty(content))
    {
        return content;
    }
    else
    {
        var result = content;

        // Add reference.
        result =
            result.Replace(
                Environment.NewLine + @"///   </References>",
                string.Format(
                    Environment.NewLine + @"///     <Reference Path=""{0}"" />" +
                    Environment.NewLine + @"///   </References>",
                    typeof (VistaDB.IVistaDBValue).Assembly.Location
                    ));

        // Change class and namespace names.
        result =
            result.Replace(
                @"System.Data.SqlClient.Sql",
                @"VistaDB.Provider.VistaDB");

        // Comment out non-available VistaDB properties.
        result = Regex.Replace(
            result,
            @"(^.*?FireInfoMessageEventOnUserErrors.*?$)",
            @"//$1",
            RegexOptions.Multiline);

        return result;
    }
}

And the method to replace the connection string is defined as follows:

private static void adjustConnectionString(DbCommand command)
{
    if (command != null)
    {
        var conn = command.Connection;

        if (conn != null)
        {
            if (conn.State == ConnectionState.Open)
            {
                conn.Close();
            }

            conn.ConnectionString = getConnectionString();
        }
    }
}

Other methods are left out for simplicity. If you want to see them, simply drop me a note, e.g. by e-mail.

Epilog

In this short article I’ve shown you a way to modify an XtraReports report during runtime of your application to work with both a Microsoft SQL Server and a VistaDB database without the need to design separate reports.

As of writing this article the reports I tested work quite well, probably/possible I will have to do further adjustments when getting to more complex reports. I will update the article then.

I am looking forward for lot of feedback! 🙂
Mehrfache Datensätze in einer Tabelle mit SQL löschen

Tisch mit Buch, darin Tipps, wie mehrfache Datensätze aus einer SQL-Tabelle zu löschen sind

Gestern habe ich versehentlich in eine Tabelle im Microsoft SQL Server doppelte Datensätze importiert.

Habe den Mario gefragt wie ich die wieder rausbekomme, seine übliche Antwort war natürlich „…geht mit Standard-SQL nicht…„.

Ha! Von wegen! Der Rainer hat genau 30 Sekunden gebraucht um den Artikel „Mehrfache Datensätze anzeigen und mit Ausnahme einer Zeile löschen“ zu finden.

Sieschd, Mario, es gooht doch! 🙂

Im verlinkten Artikel ist für mich die fast ganz unten stehende Abfrage meistens am passenden:

DELETE FROM tbl_Personen

WHERE [Personen-Id] NOT IN
(
    SELECT MIN(X.[Personen-Id])
    FROM tbl_Personen AS X
    GROUP BY X.Nachname, X.Vorname, X.Geburtstag
)