Solving „Exception of type ‚System.ComponentModel.Design.ExceptionCollection‘ was thrown.“ error messages in Visual Studio .NET 2010 Windows Forms Designer

Recently I got an error message

---------------------------
Microsoft Visual Studio
---------------------------
Exception of type 'System.ComponentModel.Design.ExceptionCollection' was thrown.
---------------------------
OK
---------------------------

when trying to edit a form in the Windows Forms Designer of Visual Studio .NET 2010. Searching Google for this error brought up some results but didn’t help me.

There was one hint that stated:

Sometimes I get the message „Exception of type ‚System.ComponentModel.Design.ExceptionCollection‘ was thrown“ When trying to open a Form in designer view.

The real problem of the „ExceptionCollection“ being thrown is that when there is a WSOD (White Screen of Darn) indicating a designer load issue, the designer gets unloaded. These get caught by the unload method and get displayed in the dialog box you see.

So, to fix this you should:

  • Attach a visual studio debugger to VS. Turn on exception catching when first thrown (in the Debug|Exceptions menu).
  • Open the designer with the debugger attached
  • Determine what component is throwing the exception.

This was actually a copy from a Microsoft Connect bug report. I tried this, but the error message still popped up and the debugger never stopped at this message (although it stopped at other native errors).

Steps to solve

Since all this didn’t help, I did another approach that was finally successfully:

  1. Make a SVN commit for the file.
  2. Open the „*.designer.cs“ file of the form that shows the error in source view.
  3. Remove larger blocks of form element declarations.
  4. Fix all compilation errors with ReSharper (i.e. ensure that nothing is red anymore on the side-indicator).
  5. Save the file. No need to compile.
  6. Open the Windows Forms Designer of the form.
  7. If the error still shows up, do a SVN revert to go back to the initial state.
  8. Repeat steps 2 to 7 until the error does not show up anymore.
  9. Now you’ve encircled the erroneous child control that causes the error.
  10. Repeat steps 2 to 7 with a smaller amount of controls you remove, until you have only one control left.

In my case it was a user control inside a group control inside a tab control, so I first identified the tab control, then the group control and then the user control.

You could isolate the user control inside a new form to further investigate. In my case it was rather easy; I put checks for design mode around most of the functions inside my control to ensure the code only gets executed if the control is not in design mode.

This fixed my error.

See also:

Resolving DevExpress ASPX HtmlEditor error

Recently I got the following error when using the DevExpress.com HTML editor control for ASP.NET.

Message: Invalid argument.
Line: 1147
Char: 3
Code: 0
URI:
http://www.zeta-producer.com/modules1-admin/DXR.axd?r=1_103

This error only occurred only in Internet Explorer and only in our production environment, not with Firefox or Google Chrome, not in the test environment.

After some searching, I found out:

  • The issue occurs somewhat near the „_aspxCreateStyleSheet“ function.
  • A poster in the DevExpress forum experiences a similar issue when using too much style sheets.

Since I am using the ASP.NET „App_Themes“ folder with a lot of style sheets, I thought that this may be my issue, too.

Resolution

By placing the following keys in the „appSettings“ section of the „web.config“ file on our production servers, I resolved the issue.

<add key=“DXEnableCallbackCompression“ value=“true“/>
<add key=“
DXEnableResourceCompression“ value=“true“/>
<add key=“DXEnableResourceMerging“ value=“true“/>
<add key=“DXEnableHtmlCompression“ value=“true“/>

I assume that the „DXEnableResourceCompression“ key probably merges multiple CSS files into one CSS, thus resolving the issue.

Please note that these „appSettings“ keys requires you to have a newer version of the DevExpress.com libraries (9.2 if I recall correctly).

Creating an XtraReports report that works both with Microsoft SQL Server and VistaDB

Currently I am extending and enhancing the reporting system for our test management tool Zeta Test.

In this article I will describe the issues I discovered (and solved) when trying to design one single report that works with both Microsoft SQL Server and VistaDB.

Creating a report

I decided to go with XtraReports from DevExpress as the reporting system.

The basic design steps creating and deploying a report with XtraReports is similar to methods when working with e.g. Microsoft SQL Server Reporting Services:

  1. Create a new report in the designer of XtraReports.
  2. Specify connection string/settings (using the SqlClient namespace classes).
  3. Specify tables/SQL queries to use as the data source for the report.
  4. Design your report graphically.
  5. Save the report to a .REPX file.
  6. Pack the .REPX file into the deployment setup.
  7. Ship the setup to the customers.

Displaying a report

In Zeta Test I had to perform the following steps when displaying a report:

  1. Load the report.
  2. Replace the design-time connection string by the connection string to the currently used database of the currently loaded project in Zeta Test.
  3. Display the report in a print-preview form.

Two databases

Since a project in Zeta Test can either use Microsoft SQL Server or VistaDB as the back-end database, I wanted to design a single report so that it can be used with both back-end databases.

Inially I planned to simply design the reports with an OleDB connection to the SQL Server database and then later when displaying the report for a VistaDB database, simply switch the connection string to the VistaDB database.

Unfortunately there is no OleDB provider for VistaDB. Therefore this solution did not work. Another idea was to simply leave the SqlClient classes that were used when designing the report as they are, only changing the connection string. This did not work, either.

So I did come up with another solution that works quite well as of writing this article:

Rewriting the .REPX report

A .REPX report file is a C# source code file that gets compiled when loading the report with the XtraReport.LoadLayout method.

I decided to give the following „algorithm“ a try:

  1. Load a .REPX file that was designed with the SqlClient classes as a string into memory.
  2. Do some string replacements to replace all SqlClient classes by their VistaDB counterparts.
  3. Call XtraReport.LoadLayout on the replaced string.
  4. Display the report in a print-preview form.

Luckily, after some try and error I actually was able to get this working!

In the following chapter I outline some of the methods I created in order to hopefully give other developers some ideas to use in their own applications:

Code to rewrite a .REPX report

The following method is the main method that is being called in order to load and display a report. It is a member of the print-preview form:

public void Initialize(
    FileInfo reportFilePath,
    Pair<string, string>[] parameters)
{
    var report = new XtraReport();

    if (Host.Current.CurrentProject.Settings.IsVistaDBDatabase)
    {
        var rawContent = UnicodeString.ReadTextFile(reportFilePath);

        var replacedContent = replaceSqlClientForVistaDB(rawContent);

        using (var ms = new MemoryStream(
            Encoding.Default.GetBytes(replacedContent)))
        {
            report.LoadLayout(ms);
        }
    }
    else
    {
        // Assumes that the report was designed with SQL Server.
        // If not, one would have to replace the other way, i.e.
        // from VistaDB to SQL Server.
        // I am leaving this out until really needed.
        report.LoadLayout(reportFilePath.FullName);
    }

    // --
    // Change connection string.

    var da = report.DataAdapter as DbDataAdapter;

    if (da != null)
    {
        adjustConnectionString(da.SelectCommand);
        adjustConnectionString(da.InsertCommand);
        adjustConnectionString(da.DeleteCommand);
        adjustConnectionString(da.UpdateCommand);
    }

    // --
    // Adjust parameters.

    if (parameters != null && parameters.Length > 0)
    {
        foreach (var parameter in parameters)
        {
            if (containsParameter(report.Parameters, parameter.First))
            {
                report.Parameters[parameter.First].Value = parameter.Second;
            }
        }
    }

    // --
    // Bind the report's printing system to the print control.

    printControl.PrintingSystem = report.PrintingSystem;

    // Generate the report's print document.
    report.CreateDocument();
}

The actual method to replace the string is the following:

private static string replaceSqlClientForVistaDB(string content)
{
    if (string.IsNullOrEmpty(content))
    {
        return content;
    }
    else
    {
        var result = content;

        // Add reference.
        result =
            result.Replace(
                Environment.NewLine + @"///   </References>",
                string.Format(
                    Environment.NewLine + @"///     <Reference Path=""{0}"" />" +
                    Environment.NewLine + @"///   </References>",
                    typeof (VistaDB.IVistaDBValue).Assembly.Location
                    ));

        // Change class and namespace names.
        result =
            result.Replace(
                @"System.Data.SqlClient.Sql",
                @"VistaDB.Provider.VistaDB");

        // Comment out non-available VistaDB properties.
        result = Regex.Replace(
            result,
            @"(^.*?FireInfoMessageEventOnUserErrors.*?$)",
            @"//$1",
            RegexOptions.Multiline);

        return result;
    }
}

And the method to replace the connection string is defined as follows:

private static void adjustConnectionString(DbCommand command)
{
    if (command != null)
    {
        var conn = command.Connection;

        if (conn != null)
        {
            if (conn.State == ConnectionState.Open)
            {
                conn.Close();
            }

            conn.ConnectionString = getConnectionString();
        }
    }
}

Other methods are left out for simplicity. If you want to see them, simply drop me a note, e.g. by e-mail.

Epilog

In this short article I’ve shown you a way to modify an XtraReports report during runtime of your application to work with both a Microsoft SQL Server and a VistaDB database without the need to design separate reports.

As of writing this article the reports I tested work quite well, probably/possible I will have to do further adjustments when getting to more complex reports. I will update the article then.

I am looking forward for lot of feedback! 🙂

C#-Windows Forms-Designer-Fehlermeldungen in Visual Studio.NET 2005

(View this article in Google-translated English)

Dieser Artikel hier soll mein Versuch werden, verschiedene Fehlermeldungen im leider nicht perfekten C#-Windows Forms-Designer von Visual Studio.NET 2005 zu interpretieren und möglichst zu lösen.

Ich werde den Artikel nach und nach um alle im Laufe der Zeit bei mir so auftretenden Fehlermeldungen und möglichst auch Lösungen ergänzen.

1.) Fehlermeldungen aufgrund von Fehlern im eigenen Code

Der Windows Forms-Designer ruft auch während des Designens Code auf den Ihr geschrieben habt (Details habe ich nie erforscht, welchen und was er ausführt, aber zumindest der Konstruktor des Forms wird aufgerufen).

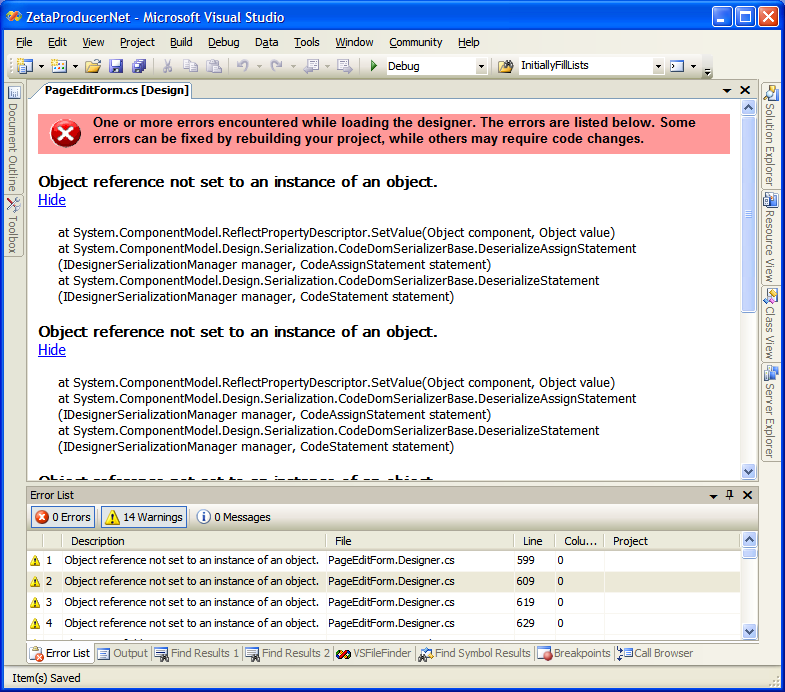
Deshalb kann es vorkommen, dass Code von Euch Ausnahmen werfen, die wiederum im Designer dann sichtbar werden und ein graphisches Arbeiten verhindern. Z.B. nachfolgendes Bildschirmfoto:


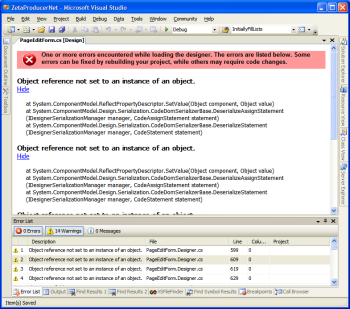
Bildschirmfoto 1: Fehlermeldungen im Form-Designer (Klick für Großbild)

Textuell kommt folgende Fehlermeldung:

Object reference not set to an instance of an object.

at System.ComponentModel.ReflectPropertyDescriptor.SetValue(Object component, Object value)
at System.ComponentModel.Design.Serialization.CodeDomSerializerBase. DeserializeAssignStatement( IDesignerSerializationManager manager, CodeAssignStatement statement )
at System.ComponentModel.Design.Serialization.CodeDomSerializerBase. DeserializeStatement( IDesignerSerializationManager manager, CodeStatement statement )

Wichtig zu verstehen ist, dass es eine beliebige Fehlermeldung sein kann, nicht nur die hier oben angegebene Null-Referenz-Ausnahme.

In meinem Beispiel war folgendes die Ursache:

Ich habe in dem Form eine eigenes Benutzer-Steuerelement („UserControl“) verwendet, das im Designermodus eine Ausnahme ausgelöst hat, und zwar beim Zuweisen einer Eigenschaft.

Der Grund für diese Ausnahme im Steuerelement war, dass zur Laufzeit gewisse Ereignis-Behandlungsroutinen aufgerufen werden (z.B. das „Load“-Ereignis des Formulars) und in diesen Behandlungsroutinen dann Variablen initialisiert werden.

Im Designmodus werden diese Behandlungsroutinen nun eben nicht aufgerufen und die Variablen eben nicht initialisiert. Deswegen hat dann die Eigenschaft eine Ausnahme ausgelöst.

Auch wenn im Designer-Fenster keine genaue Fehlerposition angegeben wurde, so zeigte die „Error List“ die genaue Position an, und zwar in Form einer „Warning“ (siehe Bildschirmfoto oben).

Ein Doppelklick auf die „Warning“-Liste öffnete dann die „*.designer.cs“-Quelltextdatei und zeigte wo der Fehler war. In meinem Beispiel war das die Zeile

this.imageControl.ImageObjectID = null;

Ein beherzter Rechtsklick mit der Maus auf ImageObjectID und dann „Go to Definition“ öffnete dann den Quelltext der ImageObjectID-Eigenschaft meines Benutzer-Steuerelements im Editor. Darin war also irgendwo der Fehler.

Lösung:

Oftmals war es für mich gar nicht nötig den genauen Fehler zu lokalisieren, da dieser ja nur im Designmodus auftrat; zur Laufzeit verhielt sich die Anwendung korrekt.

Deswegen habe ich mir eine statische Methode geschrieben die prüft, ob ein Steuerelement im Designmodus ist:

/// <summary>
/// Checks whether a control or its parent is in design mode.
/// </summary>
/// <param name="c">The control to check.</param>
/// <returns>Returns TRUE if in design mode, false otherwise.</returns>
public static bool IsDesignMode(
  Control c )
{
  if ( c == null )
  {
    return false;
  }
  else
  {
    while ( c != null )
    {
      if ( c.Site != null && c.Site.DesignMode )
      {
        return true;
      }
      else
      {
        c = c.Parent;
      }
    }

    return false;
  }
}

Diese Funktion, zentral abgelegt, rufe ich immer dann auf, wenn ich einen Codeblock quasi für den Designmodus „auskommentieren“ möchte, also eben nicht ausführen.

Ein Bisschen ein Hack, aber sehr effektiv und funktionierend.

Alternative Lösung:

Wenn Eigenschaften nicht zur Laufzeit gesetzt werden müssen, folgende Attribute an die Eigenschaft anhängen:

[Browsable(false)]
[EditorBrowsable(EditorBrowsableState.Never)]
[DesignerSerializationVisibility(DesignerSerializationVisibility.Hidden)]

Das sorgt dafür, dass der Designer die Eigenschaften komplett in Ruhe lässt.

Falls Ihr nachträglich diese Attribute setzt, müsst Ihr in den Designer-Dateien bereits vorhandene unnötige Zuweisungen zu den Eigenschaftswerten entfernen, damit es im Design-Modus funktioniert.

2.) Ein Form das im Designer geöffnet wird ist leer und zeigt keine Steuerelemente mehr an

Ich hatte einige wenige Male das Phänomen, dass ein bereits funktionierendes Formular mit zahlreichen Steuerlementen auf einmal beim Öffnen im Form-Designer komplett leer war.


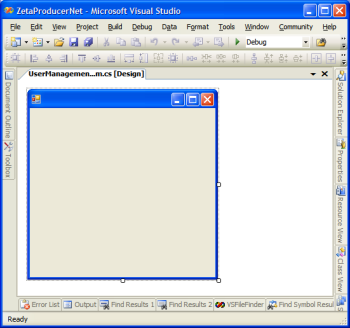
Bildschirmfoto 2: Leeres Form im Form-Designer (Klick für Großbild)

Ein Blick in die „*.designer.cs“-Datei des Forms zeigte dann, dass ganz am Ende der Funktion InitializeComponent eine oder beide dieser Zeilen fehlte:

this.ResumeLayout( false );
this.PerformLayout();

Nachdem ich diese ergänzt hatte, das Form wieder geschlossen, neu kompiliert und geöffnet hatte, war alles wieder im Form-Designer vorhanden und auch zur Laufzeit voll funktionsfähig. Manchmal reicht auch schlicht das Ergänzen der fehlenden Zeile, ohne ein Neukompilieren.


Bildschirmfoto 3: Korrekt gefülltes Form im Form-Designer (Klick für Großbild)

Die Ursache warum der Form-Designer den Code gelöscht hat ist mir leider unbekannt.

Bei meinen Fällen war danach auch der Code dauerhaft vorhanden. Jörg hat leider die Erfahrung gemacht, dass nach jedem manuellen Einfügen und Schließen der Datei, der Form-Designer den Code erneut gelöscht hat. Bei Jörg war es ein Formular mit sehr vielen Steuerelementen (ca. 200), ggf. könnte(!) das eine Ursache gewesen sein.

3.) Die Zuordnung der Eigenschaften Form.AcceptButton und Form.CancelButton gehen verloren

Relativ oft passiert es mir, dass ich einem Form im Form-Designer via Eigenschaftsfenster die Werte für Form.AcceptButton und Form.CancelButton zuweise (also die Schaltflächen die beim Benutzen der Eingabetaste bzw. der Escape-Taste ausgelöst werden) und irgendwann die Zuordnungen wieder verschwunden sind.

Die genaue Ursache kann ich leider nicht ermitteln, mir ist aber aufgefallen wenn ich Änderungen im Form-Designer Rückgängig mache (über Strg+Z oder den „Rückgängig“-Eintrag im „Bearbeiten“-Menü), die Zuordnung auch verschwindet. Ggf. hängt das damit zusammen.

Dieser Punkt ist jetzt nicht mission critical, aber dennoch lästig, weil es halt nicht sofort auffällt.

Manchmal bin ich jetzt dazu übergegangen, im Konstruktor eines Form, nach dem automatisch generierten Aufruf zu InitializeComponent() die Zuordnungen manuell hinzuschreiben, so dass diese dauerhaft erhalten bleiben.

4.) Die Schaltflächen (ToolStripItems) einer Werkzeugleiste (MenuStrip) werden nicht mehr dargestellt

Diesen Effekt hatte Kollege Thilo einmal gehabt, mit dem Ergebnis, dass die Werkzeugleiste komplett „leer“ dargestellt wurde.

Es ist nach einem Absturz der Visual Studio .NET 2005-IDE aufgetreten.

Im Endeffekt haben einige Zuordnungen in der „*.designer.cs“-Quelltextdatei gefehlt.

So sahen die relevanten Zeilen direkt nach dem Absturz aus:

...
//
// toolStrip1
//
this.toolStrip1.Items.AddRange(new System.Windows.Forms.ToolStripItem[] {
this.toolStripSeparator1,
this.toolStripSeparator2,
this.toolStripSeparator3});
this.toolStrip1.Location = new System.Drawing.Point(0, 24);
this.toolStrip1.Name = "toolStrip1";
this.toolStrip1.Size = new System.Drawing.Size(809, 25);
this.toolStrip1.TabIndex = 5;
this.toolStrip1.Text = "toolStripMain";
...

Und so die manuell korrigierte, wieder funktionierende Version:

...
//
// toolStrip1
//
this.toolStrip1.Items.AddRange(new System.Windows.Forms.ToolStripItem[] {
this.btnPublish,
this.toolStripSeparator1,
this.btnPGedit,
this.btnPGadd,
this.btnPGdel,
this.toolStripSeparator2,
this.btnAGedit,
this.btnAGadd,
this.btnAGdel,
this.toolStripSeparator3,
this.btnAedit,
this.btnAadd,
this.btnAdel});
this.toolStrip1.Location = new System.Drawing.Point(0, 24);
this.toolStrip1.Name = "toolStrip1";
this.toolStrip1.Size = new System.Drawing.Size(809, 25);
this.toolStrip1.TabIndex = 5;
this.toolStrip1.Text = "toolStripMain";
...

Thilo konnte das aus einer Sicherheitskopie (auch „Backup“ genannt) wiederherstellen.

An dieser Stelle mal der erneute Hinweis, wie wichtig Sicherheitskopien sind!

Ich „zippe“ mir immer mal wieder komplette Projektstände und speichere sie mit Datum versehen in einen Ordner (z.B. mit dem Dateinamen „myproject – 2006-07-18.zip“), so dass ich auch mehrere Schritte zurückgehen kann.

Siehe auch: Solving „Exception of type System.ComponentModel.Design.ExceptionCollection was thrown.“ error messages in Visual Studio .NET 2010 Windows Forms Designer