Eine Bibliothek von mir macht irgendwie Connections falsch zu.
Selbst mit ANTS Memory Profiler bin ich nicht so richtig weiter gekommen, um zu sehen, ob meine Annahme mit den nicht geschlossenen Connections überhaupt zutrifft.
Dann bin ich auf den Leistungsindikator (englisch „Performance Counters“) gestossen, der mir hilft: NumberOfReclaimedConnections. MSDN schreibt:
The number of connections that have been reclaimed through garbage collection where Close or Dispose was not called by the application. Not explicitly closing or disposing connections hurts performance.
In Deutsch:
Anzahl der Verbindungen, die durch die Garbage Collection (automatische Speicherbereinigung) wieder verfügbar gemacht wurden, bei denen die Anwendung weder Close noch Dispose aufgerufen hat. Nicht mehr benötigte Verbindungen, die weiterbestehen, weil sie nicht explizit geschlossen oder gelöscht wurden, beeinträchtigen die Arbeitsgeschwindigkeit.
Den wollte ich also analysieren. Ich bin gescheitert, dies via Leitungsüberwachung-MMC-Tool zu machen und fand auch keine konkreten Code-Beispiele um in der Anwendung selbst den Counter auszulesen.
Also habe ich selbst Code geschrieben, der auf meinem deutschen Windows auch funktioniert:
private static void logPerfCounter()
{
    var ina = new PerformanceCounterCategory(
        @".NET-Datenanbieter für SqlServer").GetInstanceNames();

    var pc = new PerformanceCounter
    {
        CategoryName = @".NET-Datenanbieter für SqlServer",
        CounterName = @"NumberOfReclaimedConnections",
        InstanceName =
            ina.FirstOrDefault(
                n =>
                    n.ToLowerInvariant()
                        .StartsWith(Assembly.GetEntryAssembly()
                            .GetName().Name.ToLowerInvariant()))
    };

    var nv = pc.NextValue();
    Console.Write(@" {0} ", nv);
}
Damit konnte ich dann verifizieren, dass über die Zeit hinweg der Counter stets gewachsen ist und nie gesunken.
In einer anderen Vergleichs-App war der Wert stets 0, dort habe ich die Connections also korrekt geschlossen bzw. via Dispose-Aufrufe (oder implizit via using) freigegeben.
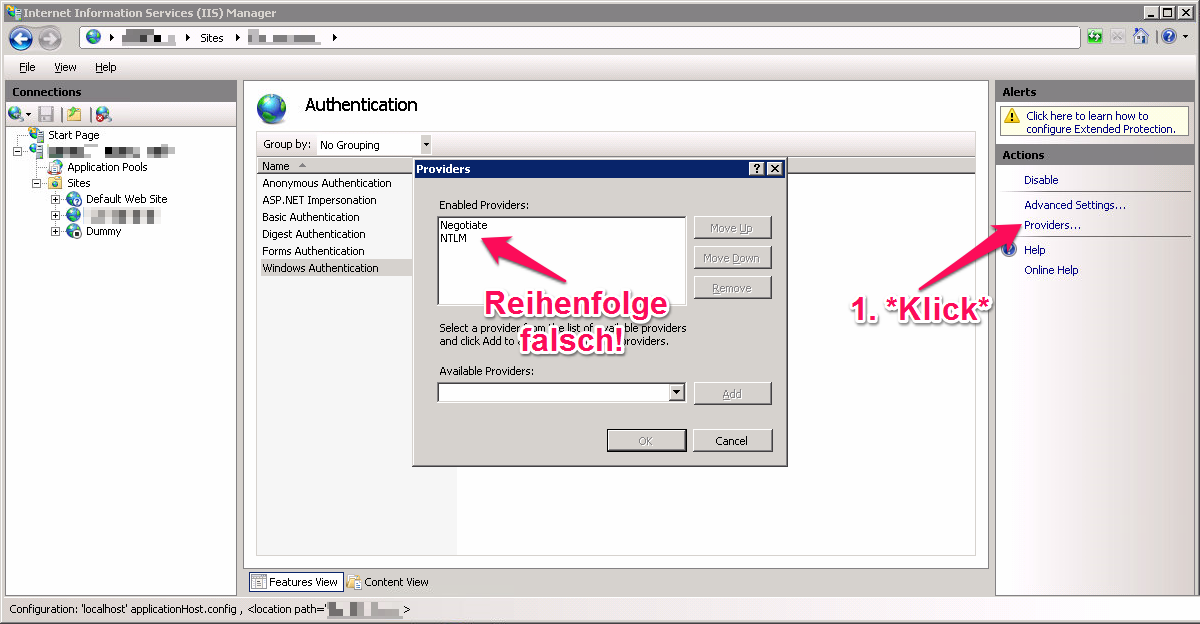
Heute habe ich bei einem Kunden den Fall gehabt, dass trotz dass Windows-Anmeldung im IIS 7 konfiguriert war, und im korrekt angezeigten Browser-Anmelde-Dialog die richtigen Anmeldedaten eingegeben wurden, keine Anmeldung möglich war.
Vielmehr ist 3 mal der Anmelde-Dialog erschienen und danach kam die HTTP-Fehlermeldung 401.2 (oder war’s 401.1?).
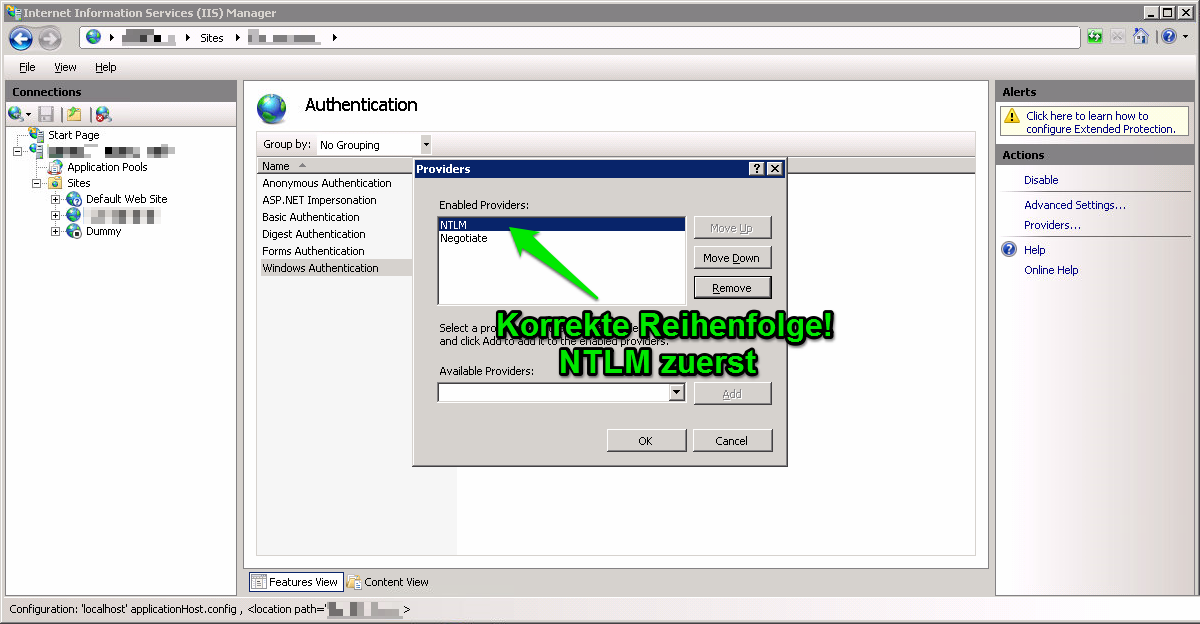
Die Lösung wurde dann von einem wirklich kompetenten Administrator beim Kunden geliefert: Die Authentifizierungsprovider waren in der Reihenfolge „Negotiate“ und dann „NTLM“.
Als wir NTLM ganz nach oben geschoben haben, ging alles.
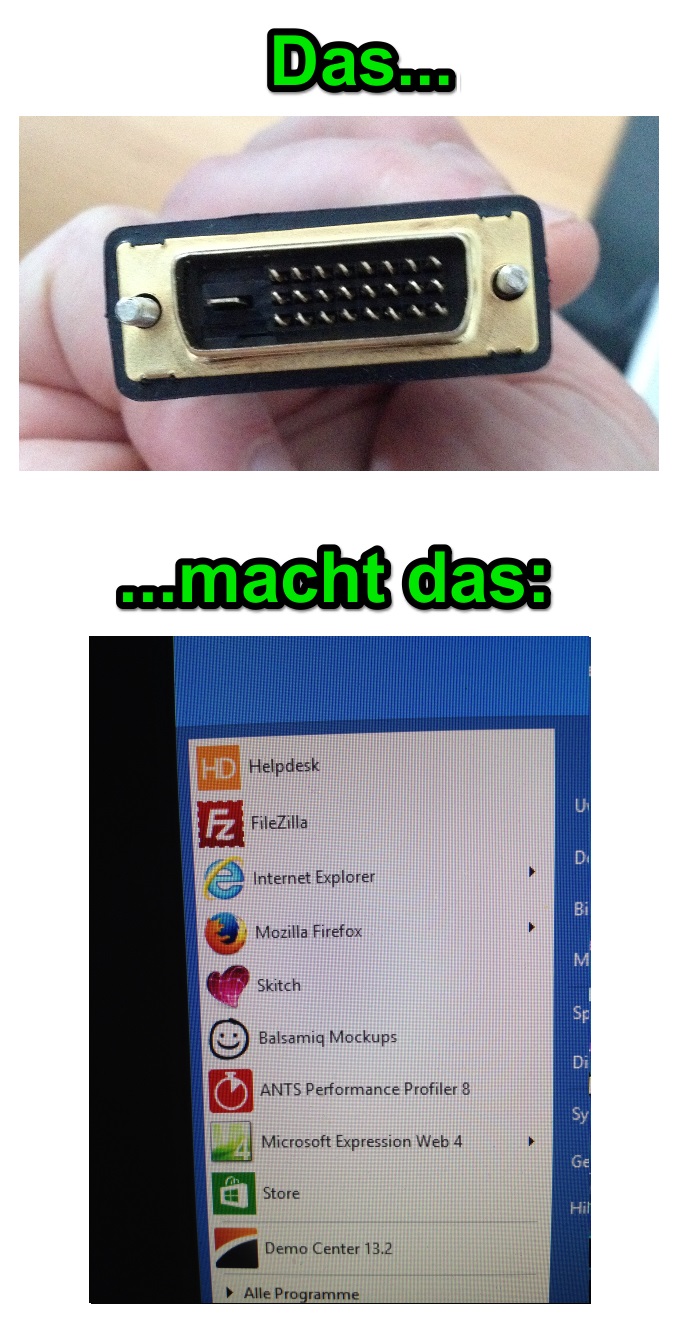
Gestern beim neu-Verkabeln meiner Monitore im Büro habe ich den Unterschied zwischen Kabeln der Bauart DVI-D (Single Link) und DVI-D (Dual Link) gelernt:
Und das hat mich auch nur 3 E-Mails und 2 Telefonate mit den durch mich geplagten Jungs beim Hardware Express gekostet.
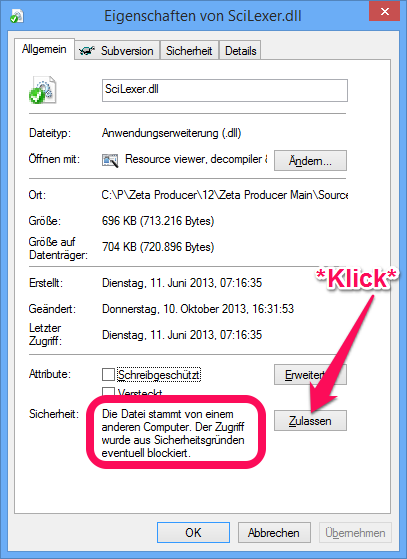
Habe eine neue DLL-Version einer Komponente downgeloadet und auf einmal bringt mein .NET-4-WinForms-Programm eine Fehlermeldung:
Die Datei oder Assembly „ScintillaNET, Version=2.5.2.0, Culture=neutral, PublicKeyToken=948d6c9751444115“ oder eine Abhängigkeit davon wurde nicht gefunden. Die minimale Berechtigung konnte nicht erteilt werden. (Ausnahme von HRESULT: 0x80131417)
Aaargh!
Ich habe dann wirklich richtig lange gesucht und dann tatsächlich die Lösung gefunden:
Lösung
Die DLL-Datei wurde von Windows als „blockiert“ markiert:
Das hier ist eine Geschichte, geprägt von Freud und Leid. Weil ich sie hier aufschreibe, ist das Leid im Vordergrund. Primär schreibe ich sie zur Selbst-Therapie auf und dass ich mich in einigen Jahren noch auf was berufen kann, wenn mich meine Erinnerung bei der Provider-Wahl zu trügen versucht.
Wir haben zurzeit 3 Webserver, alle mit dem Betriebssystem Windows Server von Microsoft. Einen Server für Zeta Uploader (ein Tool um große Dateien online zu versenden), einen Server für verschiedene Kunden-Websites, und einen Server für die Produktwebsites zu Zeta Producer (ein Content-Management-System) und Zeta Test Management (ein Test-Management-System).
Bis vor 2 Wochen waren alle Server über Jahre hinweg bei 1und1 gehostet. Seit zwei Wochen sind nun 2 der drei Server bei Internet 24 gehostet.
Wir haben über ein Jahr lang gelitten, geschwitzt, geflucht, gebettelt, gehofft und immer wieder Kunden über Downtimes hinweg versucht zu tröste (ich glaube wir waren der beste Nutzer von Uptime Robot). Am Ende hat alles nichts genutzt und wir mussten umziehen.
Was lief alles schief
Die Idee der „Dynamic Cloud Server“ klingt verlockend: Virtualisierte Server (mit Xen) mit schöner Admin-Web-GUI bei der ich via Schieberegler diverse Einstellungen wie RAM, CPU und Festplatte so konfigurieren kann, dass ich sie an unsere Bedürfnisse anpassen kann.
In der Praxis war genau das Gegenteil der Fall: Die Server reagierten träge, langsam und mit häufigen Ausfällen. Meine starke Vermutung ist, dass die Host-Rechner (also die physikalischen Computer, auf denen die virtuellen Computer laufen) so maximal ausgelastet sind, dass ich mit den Schiebereglern zwar meine Wünsche angeben kann, jedoch diese nichts mit der tatsächlichen Ressourcen-Zuteilung in der Praxis zu tun haben. Doch selbst eine schlechte Performance hätte ich verkraftet, wären da nicht die ständigen/häufigen Ausfälle gewesen.
Unser Zeta-Uploader-Server ist die rühmliche Ausnahme: Der läuft weiterhin bei 1und1, und zwar wie die sprichwörtliche 1: Er ist nicht der schnellste, dafür ist er quasi immer erreichbar und quasi nie down. Dieser Server läuft, so wie ich es wohl verstanden habe, auf einer Xen-5.5-Umgebung. Keine Treiber-Issues, nix.
Unsere beiden anderen Server liefen auf einer Xen-6.x-Umgebung.
Und genau diese beiden Server liefen wie Dreck. Nämlich nach Lust und Laune des Hosters. Meistens am Wochenende waren sie nicht erreichbar, erst am Montag, nachdem wohl ein Techniker die Hosts neu gebootet/whatever damit gemacht hat. Das ganze lief regelmäßig, pünktlich zum Wochenende so ab:
Server antwortet nicht mehr.
Control-Center (Web-Oberfläche) erlaubt es nicht den Server aus- und wieder einzuschalten.
Hotline schafft es nicht, Server aus- und wieder einzuschalten.
2nd-Level-Kollegen von Hotline schaffen es nicht, Server aus- und wieder einzuschalten.
Administratoren schaffen es dann (nur Werktags!) wohl irgendwie, den Server auszuschalten.
Ich entdecke zufällig, dass ich Server jetzt wieder hochfahren kann.
Ich fahre Server via Control-Center hoch.
Server startet natürlich nicht normal, sondern im Rescue-Modus.
Ich boote neu im normalen Modus.
Server booten in Zeitlupe.
Nach 40 Minuten(!) warten ist Server dann gebootet.
Server läuft immer noch in Zeitlupe.
Die ersten zig Male habe ich immer versucht, Fehler bei mir selbst zu finden und alles mögliche probiert, leider erfolglos. Irgendwann haben wir dann einen „Platin-Support“ für etwa 10 Euro pro Monat mit dazu gebucht. Effekt war, dass die Warteschleife umgangen wurden, die Supporter dahinter waren genau so höflich und kompetent wie beim Nicht-Platin-Support. Also höflich und hilfsbereit waren sie wirklich, kompetent im Sinne von, dass sie etwas bewirken konnten, waren sie leider nicht. Es hieß am Wochenende dann oft „das müssen wir an den 2nd-Level-Support eskalieren lassen“ (oder so ähnlich), mit dem Zusatz „das kann schon Montag werden, bis es wieder läuft“. Arrgh. Da saß ich immer wie auf Kohlen.
Schön (im sarkastischen Sinne) waren anschließend auch immer die belanglosen, wohl von Robotern erstellten E-Mail-Nachrichten:
Ihr Dynamic Cloud Server ist wieder wie gewohnt erreichbar.
Bitte entschuldigen Sie die entstandenen Unannehmlichkeiten.
Wir wünschen Ihnen weiterhin viel Spaß mit unseren Produkten.
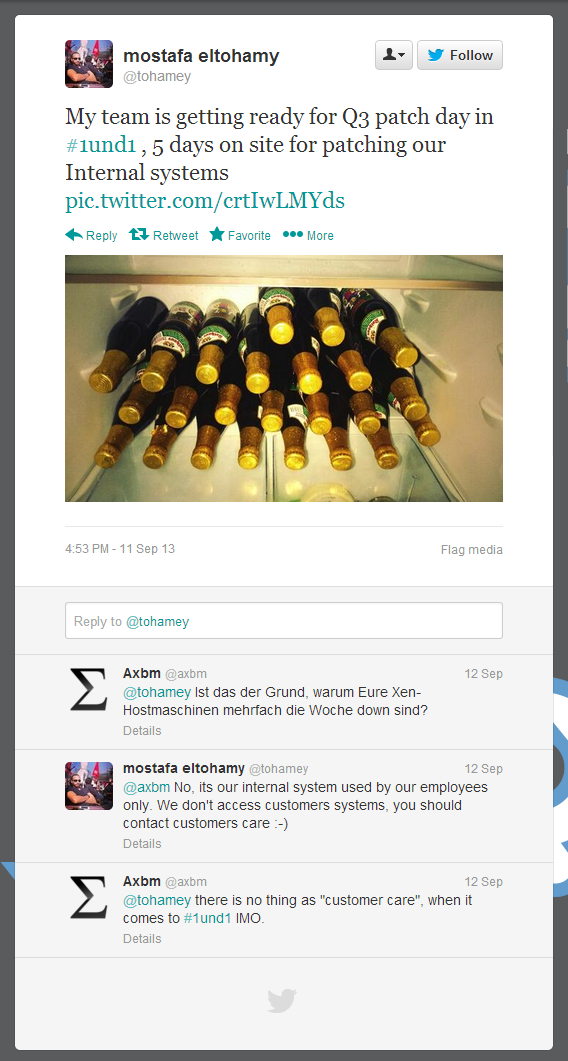
Es hat viele Versuche gedauert, bis 1und1 überhaupt zugegeben hat, dass der Fehler bei ihnen liegt. Es hieß dann lapidar „Es lag eine Störung im Hostsystem vor“. (Ob so was hier [als Bild] wohl repräsentativ ist?)
Lösungsansätze
Irgendwann habe ich dann angefangen, mich weiter zu erkundigen und bin auf die Möglichkeit gestoßen, die Xen-Netzwerk-Treiber in meinem Gast-Windows zu aktualisieren. Da habe ich wirklich viel Zeit investiert und nach viel nachbohren dem 1und1-Support wenigstens die Xen-Versionsnummer entlocken können. Sogar einen Bekannten („Facebook-Freund“), der bei Citrix arbeitet (die Firma hinter Xen) habe ich mit den Fehlern und der Thematik konfrontiert und er hat mir einige Tipps geben können, die gefühlt geholfen haben. Objektiv waren jedoch immer wieder die Aussetzer der Server.
Ich habe meinen Bekannten auch gefragt, ob man mit Xen 6 überhaupt ein stabiles System hinbekommen kann, worauf er mir mit Screenshots von Uptime-Charts von 190+ Tagen geantwortet hat. Es geht also. Xen kann das, die Admins scheinen es hier wohl nicht hin zu bekommen. Warum auch immer, ich vermute einfach Kostendruck.
Eines Tages habe ich dann einen ehrlichen Supporter am Telefon gehabt, der mir am Ende sagte „Ach, wissen Sie, Xen und Windows, das ist auf Dauer einfach nicht stabil hin zubekommen“. Der Tenor war für mich „Damit müssen Sie leben, seien Sie froh, dass es überhaupt läuft“. WTF? Dass unser Xen-5.5-Server stabil läuft ist für mich ein Beweis, dass es durchaus funktionieren kann, ebenso wie die Aussagen meines Bekannten.
Lösung
Es musste also eine Lösung her, und die war eindeutig außerhalb von 1und1 zu sehen. Doch wie vorgehen, um nicht vom Regen in die Traufe zu kommen?
Jeder Hoster, den ich mir so angeschaut habe hatte Vor- und Nachteile. Mal zu groß, mal zu klein, mal keine Windows-Server und mal irgend was anderes seltsames. Mein geschätzter Kollege M. hat dann nach viel Recherche und einigen Telefonaten den Hoster „Internet 24“ in Dresden ausfindig gemacht. Der ist groß genug um saubere Technik und Kompetenz zu liefern und gleichzeitig persönlich genug um immer direkt einen kompetenten Techniker am Draht zu haben.
Seit ca. 2 Wochen laufen jetzt also unsere Server bei Internet 24. Noch zu kurz um eine aussagekräftige Bewertung abzugeben, doch bereits der Anfang war geprägt von lauter positiven Eindrücken, die auch nach dem Kauf weiter anhielten, bis heute.
Epilog
Web-Hosting ist halt wohl ein genau so kaputter Markt wie alle anderen von BWL-ern „optimierten“ Branchen auch. Damit muss ich halt wohl leben und immer wieder mal zum „Server-Nomaden“ werden, wenn ein Hoster zu groß wird und die Qualität nachlässt.
Wenn 1und1 unsern auf Xen 5.5 laufenden Server nach Xen 6.x upgradet gehe ich davon aus, dass ich den auch umziehen muss, weg von 1und1.
Die Server bei Internet 24 sind schöne Intel-Xeon-Rechner mit viel RAM und Hewlett-Packard-RAID; der Support von Internet 24 ist erstklassig und tatsächlich per E-Mail Tag und Nacht sehr schnell und (fast immer) sehr kompetent zu erreichen.
Ich bin richtig glücklich mit Internet 24 und hoffe, das bleibt auch so.
Update 2013-11-03
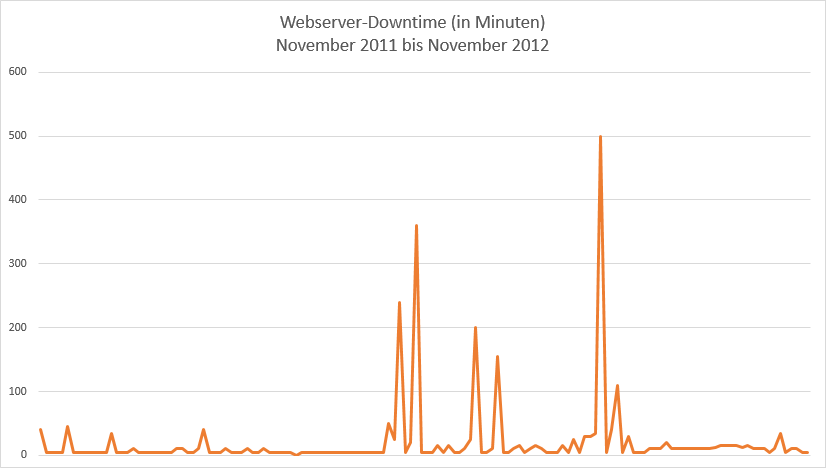
Ich habe mir mal die Pingdom-Alerts angeschaut und ausgewertet:
Es waren im Schnitt 10 Downtimes pro Monat. Pro Monat! Und das waren nur die, die Pingdom auch gemessen hat. Alles unter 5 Minuten ist da noch gar nicht dabei.
Update Mai 2018
Wir sind jetzt inzwischen fünf Jahre bei „Internet 24“. Das lief dort alles wesentlich stabiler als beim vorherigen Provider.
Unsere Hardware-Server sind inzwischen in die Jahre gekommen, und müssen irgendwann ausgetauscht werden.
Da „Internet 24“ inzwischen (mehrfach?) verkauft wurde, unsere Server inzwischen (mehrfach?) physikalisch in andere Rechenzentren umgezogen wurden, es ein paar wenige technische Peinlichkeiten gegeben hat (z. B. eine Firewall, die auf einmal wieder geschlossene Ports geöffnet hatte), und der Support sich in letzter Zeit auch von persönlichen Ansprechpartnern, hin zu unpersönlichen Web-Ticket-Masken hin geändert hat, haben wir uns entschieden, nochmals umzuziehen.
Die Wahl fiel dabei nach viel Nachdenken, Recherchieren, Ausprobieren und Testen auf Amazon Web Services, AWS.
Wir haben einen Kunden/Partner, der seit über 10 Jahren mit AWS sehr zufrieden ist, und uns die Thematik ausführlicher dargelegt hat. Inzwischen haben wir schon ein paar Linux- und Windows-Server bei AWS, und die Stabilität, Geschwindigkeit und Zuverlässigkeit sind atemberaubend.
Wenn man genau weiß, was man sich zusammen konfiguriert, sind nach unserer Erfahrung auch die Kosten sehr wettbewerbsfähig.
Gegen Mitte/Ende 2018 wollen wir alle Server zu AWS umgezogen haben.
Eine neue Website mit ASP.NET MVC 4, frisch auf einen Server publiziert, lieferte die Fehlermeldung:
Die Datei oder Assembly „DotNetOpenAuth.Core, Version=4.0.0.0, Culture=neutral, PublicKeyToken=2780ccd10d57b246“ oder eine Abhängigkeit davon wurde nicht gefunden. Die gefundene Manifestdefinition der Assembly stimmt nicht mit dem Assemblyverweis überein. (Ausnahme von HRESULT: 0x80131040)
Im Englischen klingt das ungefähr so:
Could not load file or assembly ‚DotNetOpenAuth.Core, Version=4.0.0.0, Culture=neutral, PublicKeyToken=2780ccd10d57b246‘ or one of its dependencies. The located assembly’s manifest definition does not match the assembly reference. (Exception from HRESULT: 0x80131040)
Nach viel Suchen, fand ich schließlich die Lösung:
Da ich dieses „DotNetOpenAuth.Core“ via NuGet installiert hatte, wurde in meiner lokalen Web.config-Datei automatisch Einträge ergänzt. Diese Einträge haben im öffentlichen Web auf dem Webserver noch gefehlt.
Ich wollte unterschiedliche Zeilen in Microsoft Office Excel zählen, dachte das geht ganz einfach, wurde eines Besseren belehrt und bekam dann Hilfe auf Super User:
