Using Notepad++ to edit a „Web.config“ ASP.NET configuration file, I was missing the XML syntax coloring.
Since I found no way to do it through the Notepad++ GUI, I searched for a manual way that luckily exists.
Here is how:
- Open the „stylers.xml“ Notepad++ configuration file by:
- Click „Start“.
- Click „Run“.
- Enter „%appdata%\Notepad++“ (without the quotes) and click „OK“. The folder „C:\Users\YourUserName\AppData\Roaming\Notepad++“ will be opened.
- Open the file „stylers.xml“ in a text editor, e.g. Notepad++ itself.
- Search for the line „<LexerType name=“xml“ desc=“XML“ ext=““>„.
- Replace it with „<LexerType name=“xml“ desc=“XML“ ext=“config“>„. (For multiple entries separate them by spaces, write the extensions without leading periods)
- Save the file „stylers.xml“.
- (Re-)start Notepad++.
Now you have associated the extension „.config“ with the XML syntax coloring.
Please note that in case you had an unassociated file open in Notepad++ before associating with a lexer and restart Notepad++ with the file automatically being opened again, this file still is shown without syntax coloring. You first have to close and reopen that file to have the new syntax coloring being applied.
Update 2013-03-01
I just found out that you can also do it via the GUI like the following.
1.) Click the menu:
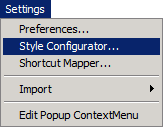
2.) Configure your extension:

Notepad++ find ich auch klasse! Ich mach da immer die uncoolen PHP-Sachen damit – wobei ja WordPress z.B. schon ganz cool ist 😉
Ja, WordPress ist eines der ganz wenigen herausragenden PHP-„Anwendungen“. Und natürlich unser Service-BW.de-Modul 😉
Oh, ja ganau – euer Service-Modul hab ich natürlich vergessen, entschuldige… 😉
Thanks for this, it solved my problem
Gerne doch 🙂